BLOG

Mould Removal For Beginners: Steps To Take Immediately After Discovery
Mould Removal For Beginners: Steps To Take Immediately After Discovery
Discovering mould in your home can be a daunting experience. Whether it’s lurking in a forgotten corner or blatantly invading your bathroom ceiling, mould can cause problems not only for your property but also for your health. For beginners, it might feel overwhelming to tackle, but mould removal doesn’t have to be complicated if you know where to start. Let’s dive into the steps you should take immediately after discovering mould, providing you with a relaxed yet informative guide to get you on the right track.
Step 1: Stay Calm And Assess the Situation
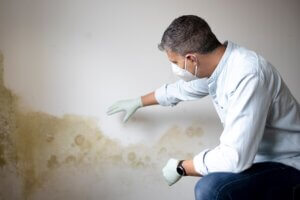
When you first spot mould, it’s crucial to stay calm. Panicking won’t help and neither will ignoring the problem. Start by assessing the situation carefully. Look at the affected area to gauge the size and extent of the mould infestation.
Small patches, such as those found on bathroom grout or windowsills, might be manageable with DIY methods. However, extensive mould growth, especially if it covers more than a square metre, may require professional help. Not all moulds are the same; some types are more harmful than others. Identifying the type of mould you’re dealing with can also help you determine the best course of action. It’s helpful to take notes or photos of the mould to track its spread over time.
Step 2: Protect Yourself
Before you start mould removal, it’s vital to protect yourself. Mould spores can be harmful when inhaled or when they come into contact with your skin. Wear gloves, a mask and goggles to protect yourself from potential exposure.
Make sure the area is well-ventilated to avoid breathing in airborne mould spores. Additionally, wearing old clothes that you can discard or wash thoroughly afterwards is a good idea. Remember, some moulds can produce toxins that can affect your health, leading to symptoms like coughing, sneezing, or more severe respiratory issues. Proper protection is key to safely removing mould.
Step 3: Contain the Spread

To prevent the mould from spreading to other areas, it’s crucial to contain the affected area. Close doors or seal off the area with plastic sheeting if possible. This step is particularly important if you’re dealing with larger patches of mould.
You don’t want to inadvertently spread mould spores throughout your home, making the problem worse. If the mould is on a loose item, like a piece of clothing or a rug, remove it carefully and seal it in a plastic bag to prevent spores from dispersing. Mould can spread quickly, so containing the area is essential to managing the problem effectively.
Step 4: Remove And Dispose Of Affected Materials
If the mould has affected porous materials like drywall, carpet, or fabric, it’s often best to remove and dispose of these items. Porous materials can be difficult to clean thoroughly and mould can easily grow back if not properly treated.
Carefully remove any affected materials and seal them in plastic bags before disposal. This helps prevent further contamination and contains the problem to one area. When disposing of mouldy materials, follow your local council’s guidelines for disposal, as mould can be considered hazardous waste.
Step 5: Clean The Area
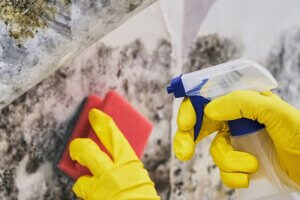
After removing affected materials, it’s time to clean the remaining surfaces. For small mould infestations, you can use a mixture of household detergent and water to scrub the area. Apply the solution with a scrub brush or sponge and make sure to rinse thoroughly.
Avoid using bleach, as it can be harmful to your health and may not effectively remove mould from porous surfaces. If you’re dealing with a larger infestation or if the mould has penetrated deeply into surfaces, you might want to use specialised mould removal products or seek professional help. It’s also important to dry the area quickly after cleaning, as moisture can encourage mould regrowth.
Step 6: Dry The Area Thoroughly
Mould thrives in damp conditions, so drying the area thoroughly is crucial to preventing regrowth. Use fans, dehumidifiers, or open windows to dry out the area as much as possible. It’s also a good idea to fix any leaks or sources of moisture that may have contributed to the mould growth in the first place.
Keeping the area dry and well-ventilated is key to preventing future mould problems. Regular maintenance, like checking for leaks and ensuring proper ventilation, can go a long way in mould prevention.
Step 7: Monitor For Regrowth

Even after thorough mould removal, it’s important to monitor the area for signs of regrowth. Mould can be persistent and it may return if the underlying moisture problem isn’t addressed. Regularly inspect the area and be vigilant for any new signs of mould.
If you notice any new growth, take immediate action to remove it and address the underlying cause. Monitoring is especially important in areas prone to moisture, such as bathrooms, basements, or kitchens.
Work With The Professionals
Mould removal can be straightforward if you follow these steps and take a calm, informed approach. By assessing the situation, protecting yourself, containing the mould, removing affected materials, cleaning, drying and monitoring for regrowth, you can effectively tackle mould in your home.
However, if the infestation is extensive or if you have health concerns, don’t hesitate to call in professional help. NTCSC offers expert mould removal services, ensuring your home is safe, clean and mould-free. Mould removal doesn’t have to be a nightmare, especially when you’re equipped with the right knowledge and tools. Give us a call anytime 24/7. We’re here to help.